 download the apps!
the docs
 >
usage
>
using veadotube
>
the node system
the node system
nodes! the thing that most intimidates new users, but also opens a ton of doors for both avatar makers and performers. the thing that powers the nodes panel, but also secretly powers veadotube mini behind the scenes as well.
overview

think of each node being an operation you can do on a value that outputs another value. these values can be a number, a point, text, a boolean (true or false), or even more complex stuff like audio clips or bitmap images, or even a null value.
most nodes take in values and transform them into other values. some will simply provide values from a given source (inputs, system data, external programs, etc). some nodes will generate them, according to your configuration.
built-in nodes will automatically spawn, representing different parts of the scene/avatar you’re editing, and you’ll be able to provide node values that control these behaviors.
to add a new node to the graph, right-click the nodes panel and select which node you wanna create. then, to connect one node onto another, you simply click and drag starting from one output to an input, or vice-versa, creating a tube between them, where values can pass through. you can click on a tube to delete it, or drag it to create a corner for cable management purposes.
you must pay attention to the type of value that a node accepts and outputs, as these must match for the connection to be valid. hovering a node slot  will let you know exactly what type of data it expects to go through (the so-called node usage), but the color-coding will give you a hint as well.
booleans and numbers (and audio)
say you’re trying to make a mini avatar in a scene open its mouth. to control it, you must pass a value to voice activity, which is a blue slot  . that’s a
 Boolean usage! it means that any value you pass to it must be
true or false, for open and closed mouth, respectively.
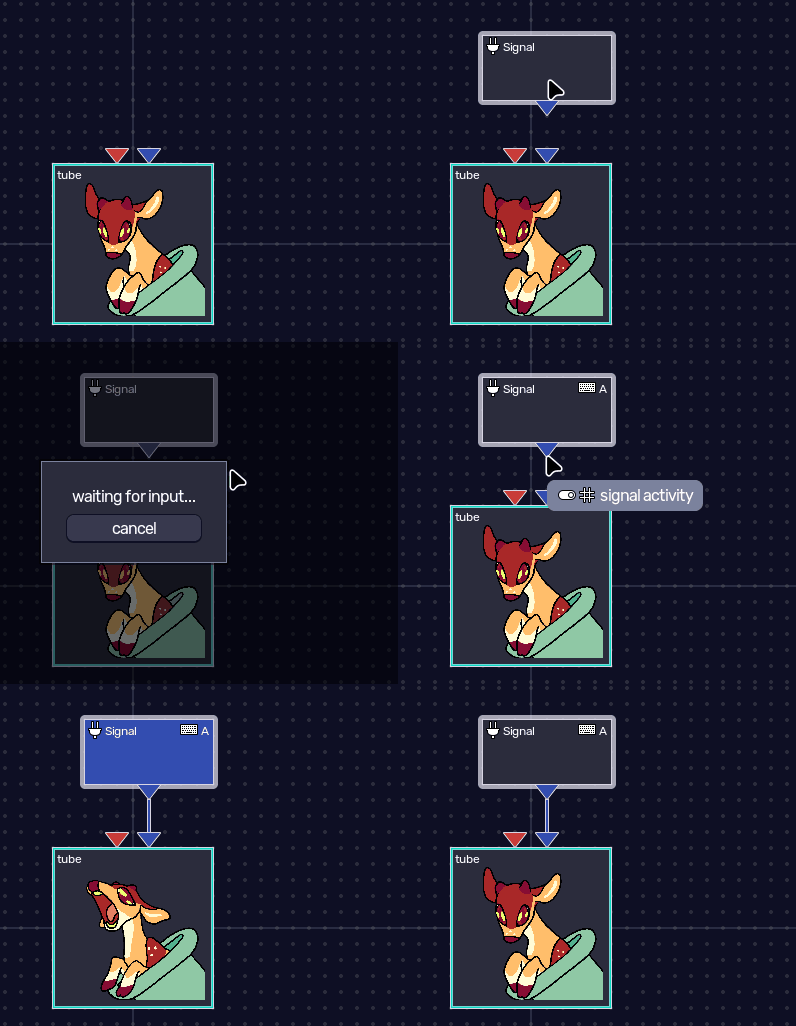
lots of nodes output booleans! a very straight-forward one is the Signal node: you right-click it to configure it to capture a shortcut from your computer (similar to shortcuts in veadotube mini), and then it’ll output true when the shortcut is pressed. this can be directly passed to the voice activity input.
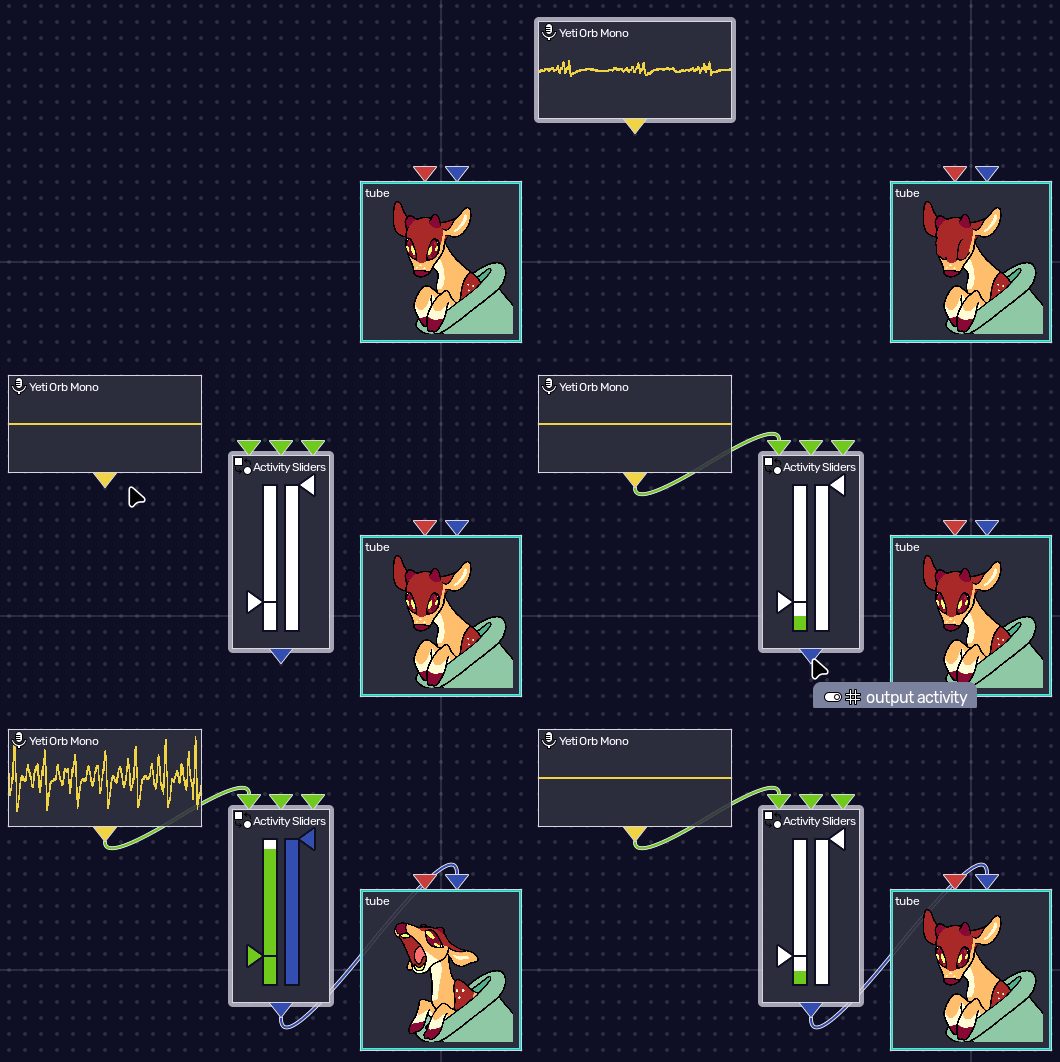
using an audio source has a few extra steps. you can create a Microphone, right-click it to select which device to capture, and it’ll start outputting an  Audio value, denoted by a yellow slot
 . so now your task would be to convert that into a boolean.
a familiar method would be to add an Activity Sliders, and connect the microphone to the number input slot. this slot is green  , denoting that it accepts a
 Number value, but the trick is that audio nodes inherently output a number as well, ranging from 0 (complete silence) to 1 (maximum volume).
another way would be to use one of the lipsync solutions in the Audio category; they accept an audio input directly. although they output a lot of data meant for multiple mouth shapes, they also give you a boolean for whether someone’s speaking in the provided audio clip or not. they also return a probability value as a number, meaning you can still put an Activity Sliders node after it for finer control.
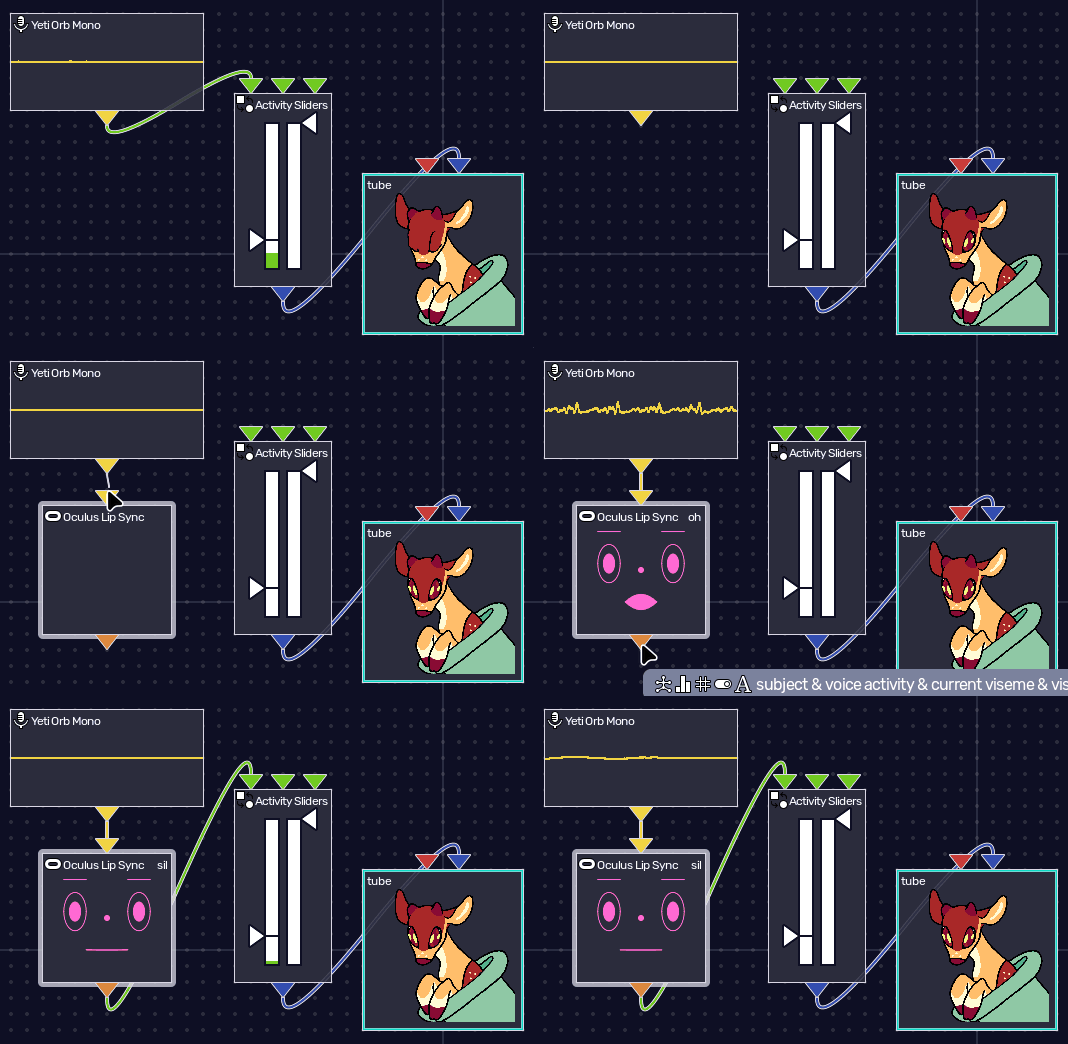
veadotube mini uses these nodes behind the scenes! this is why the noise filter is called “Oculus”, for example.
numbers aren’t only useful to be converted to booleans. say you’re creating a dynamic avatar, and you added a rotate dynamic to a layer. this will spawn a node that receives a number, which becomes the rotation angle. when connecting an audio node to it, the layer will rotate according to the volume level!
you can do operate on numbers with nodes in the Number and Math categories. one useful node for this scenario would be Remap, to set a lower and an upper limit to the volume level before turning it into the rotation value.
obviously, you can also use nodes that aren’t inputs. the Waver node, for example, generates a continuous sine wave, which you can adjust the velocity/offset/amplitude of. you can also combine generators and inputs, and so on!
strings and states
let’s say instead that you created a state group in states and you’re trying to change states through nodes. the spawned node has one red input slot  , denoting a
 String value! strings are textual values, so you must pass the name of a state for it to register.
there are many ways to pass strings. for example, you can create a constant string value through Value in the String category and right-clicking it to rename it. this will, however, only return one value, so that’s no fun.
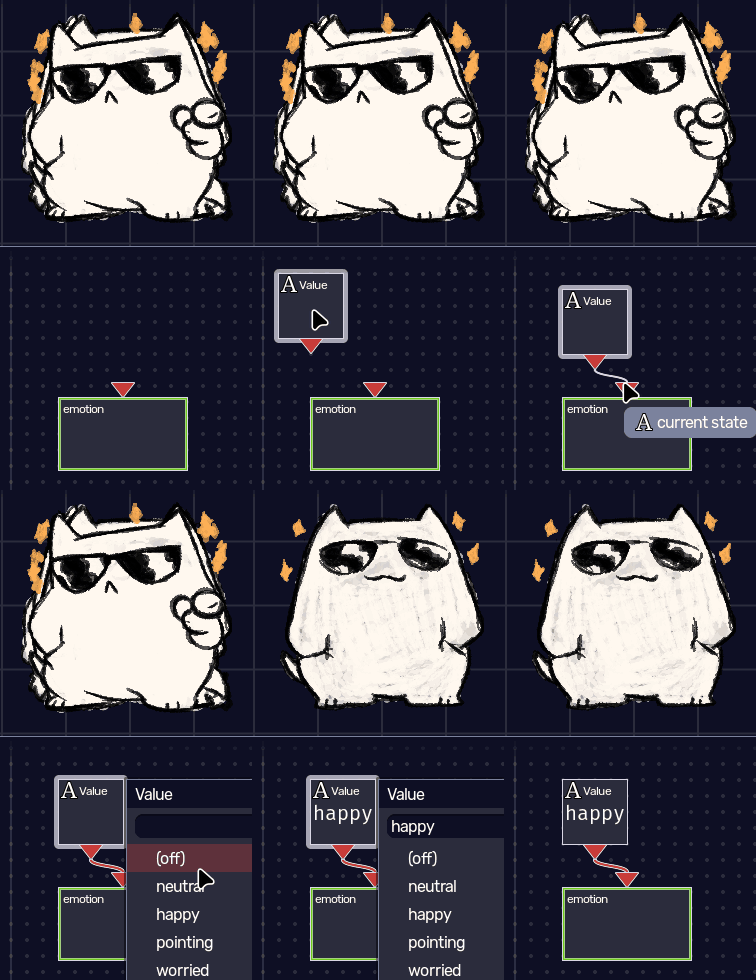
a cool trick with constants is that you can use them to convert booleans to strings: using the Branch on Boolean node will let you connect a boolean (say, the Signal node from earlier) to the first slot, and two different string constants to the other slots. now the current state depends on whether you’re holding a key or not!
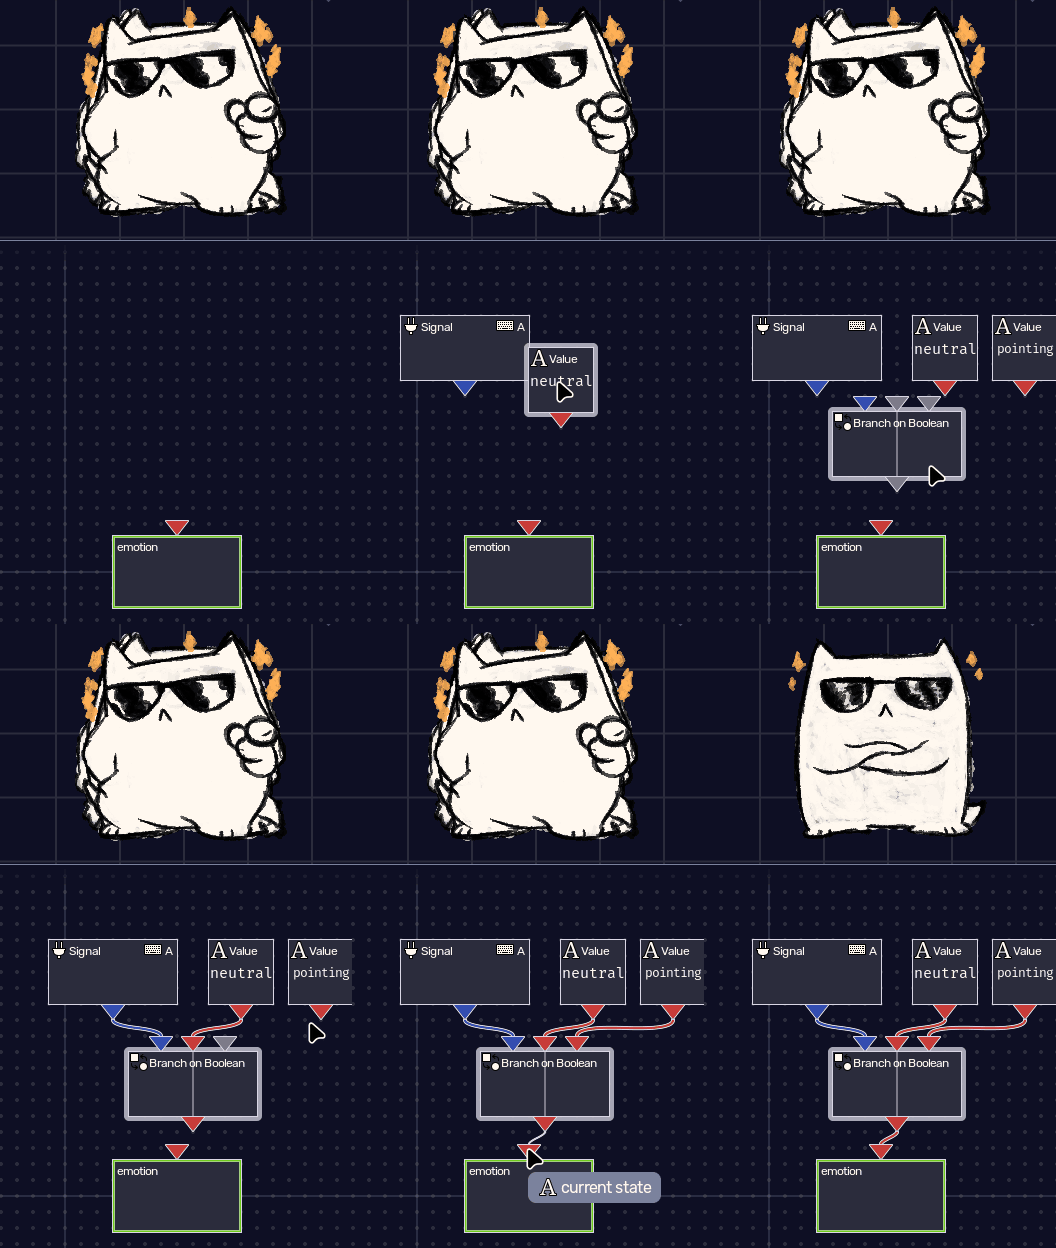
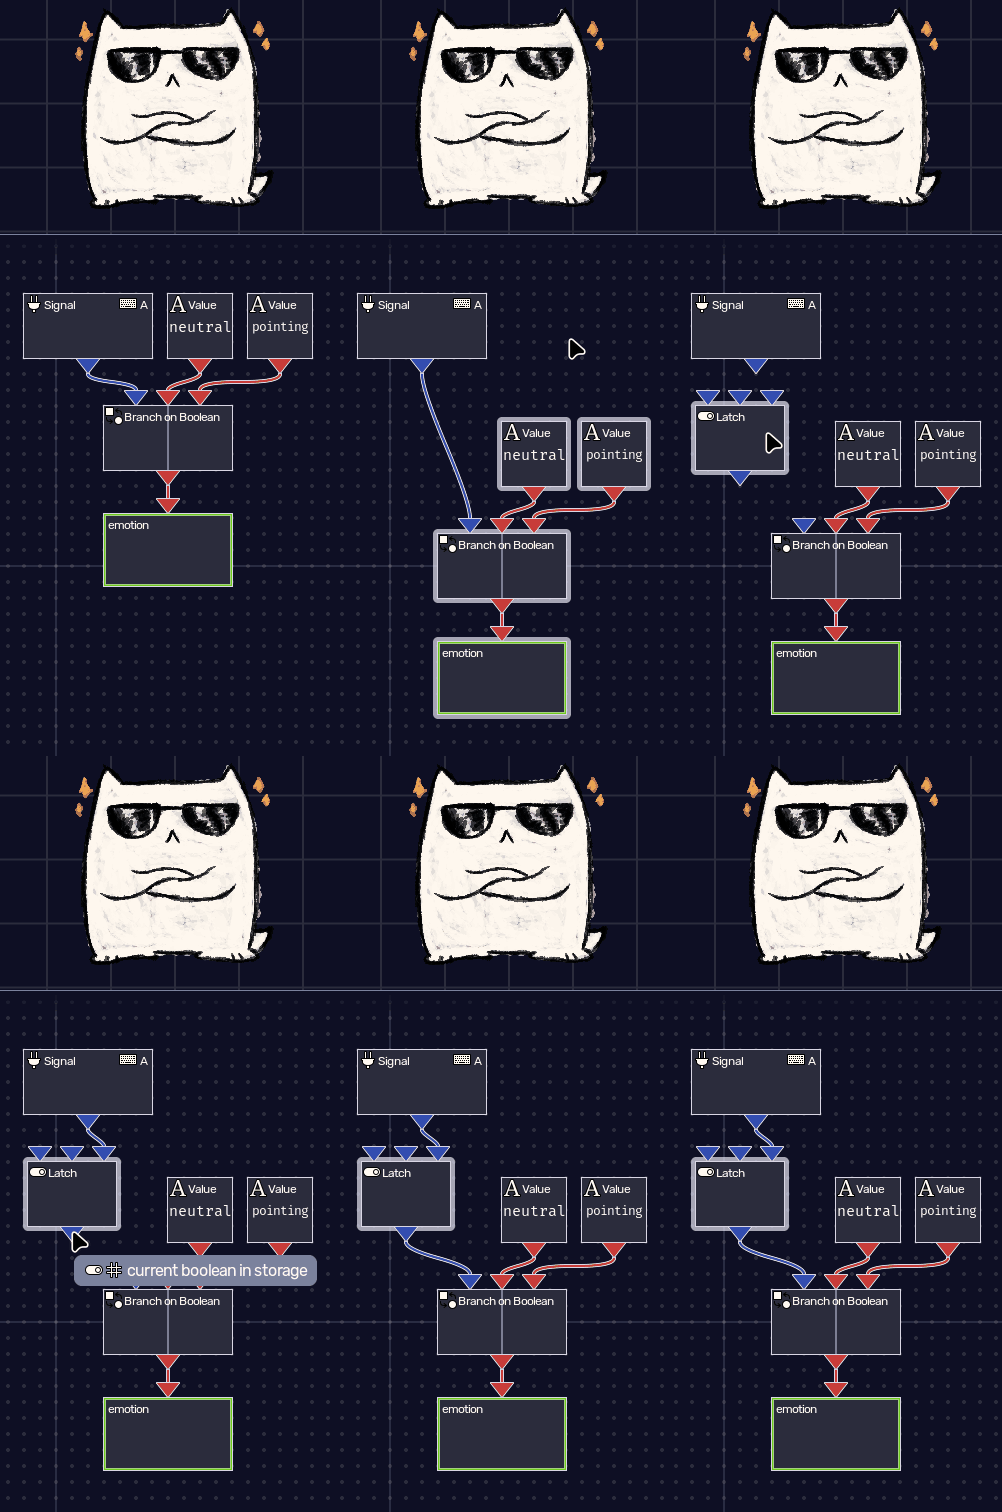
you can also put that boolean through a Latch node, which remembers the previous value and can be used to toggle states.
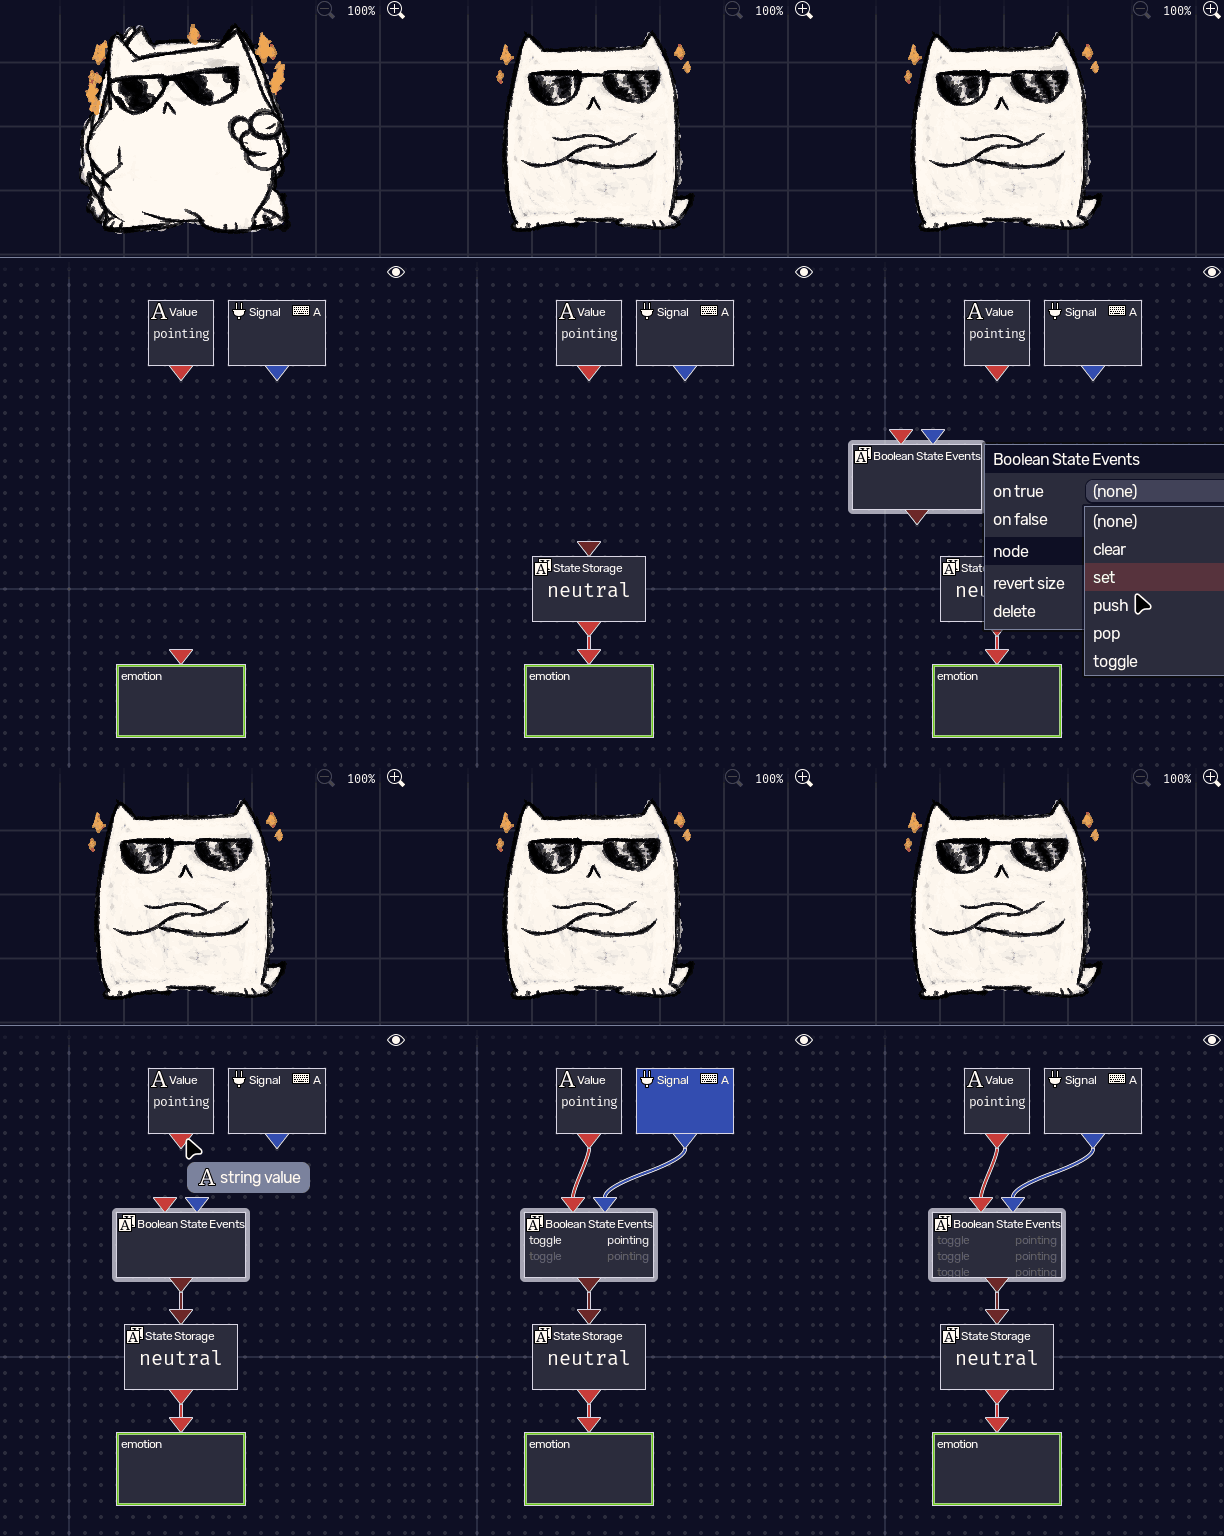
this would obviously get too complicated if you have multiple states to set. enter two useful concepts: state events and storage.
a few nodes in the State category output  State Events, denoted by a dark red slot
 . those cannot be used as strings directly; they’re merely instructions for a state stack (not quite a stack in the conventional computer programming sense, as operations are not the same). possible instructions are:
- set: clears the stack and adds a state
- push: adds a state to the top of the stack. if a state’s already in the stack, remove it and add at the top
- pop: removes the state from the stack, wherever it may be
- toggle: pushes if it’s not in the stack, pops if it is
- clear: clears the stack. depending on who’s receiving this event, this might mean clear and add the default state
the node that handles these instructions and manages a stack is State Storage. it then outputs the state at the top of a stack as a proper string that can be used. this way, you can have multiple state event nodes connected to it, and a single source of truth of the current state.
a simple way to convert a boolean to state events is through the fittingly named Boolean State Events node. with it, you supply the boolean value, the string that will be sent as an event, and right-clicking it will let you configure which instructions to send depending on whether a boolean just became true or false.
if you have multiple shortcuts, you can instead use a Signal State Events node. it fetches the list of states from connected nodes below and lets you assign a signal combo for each state.
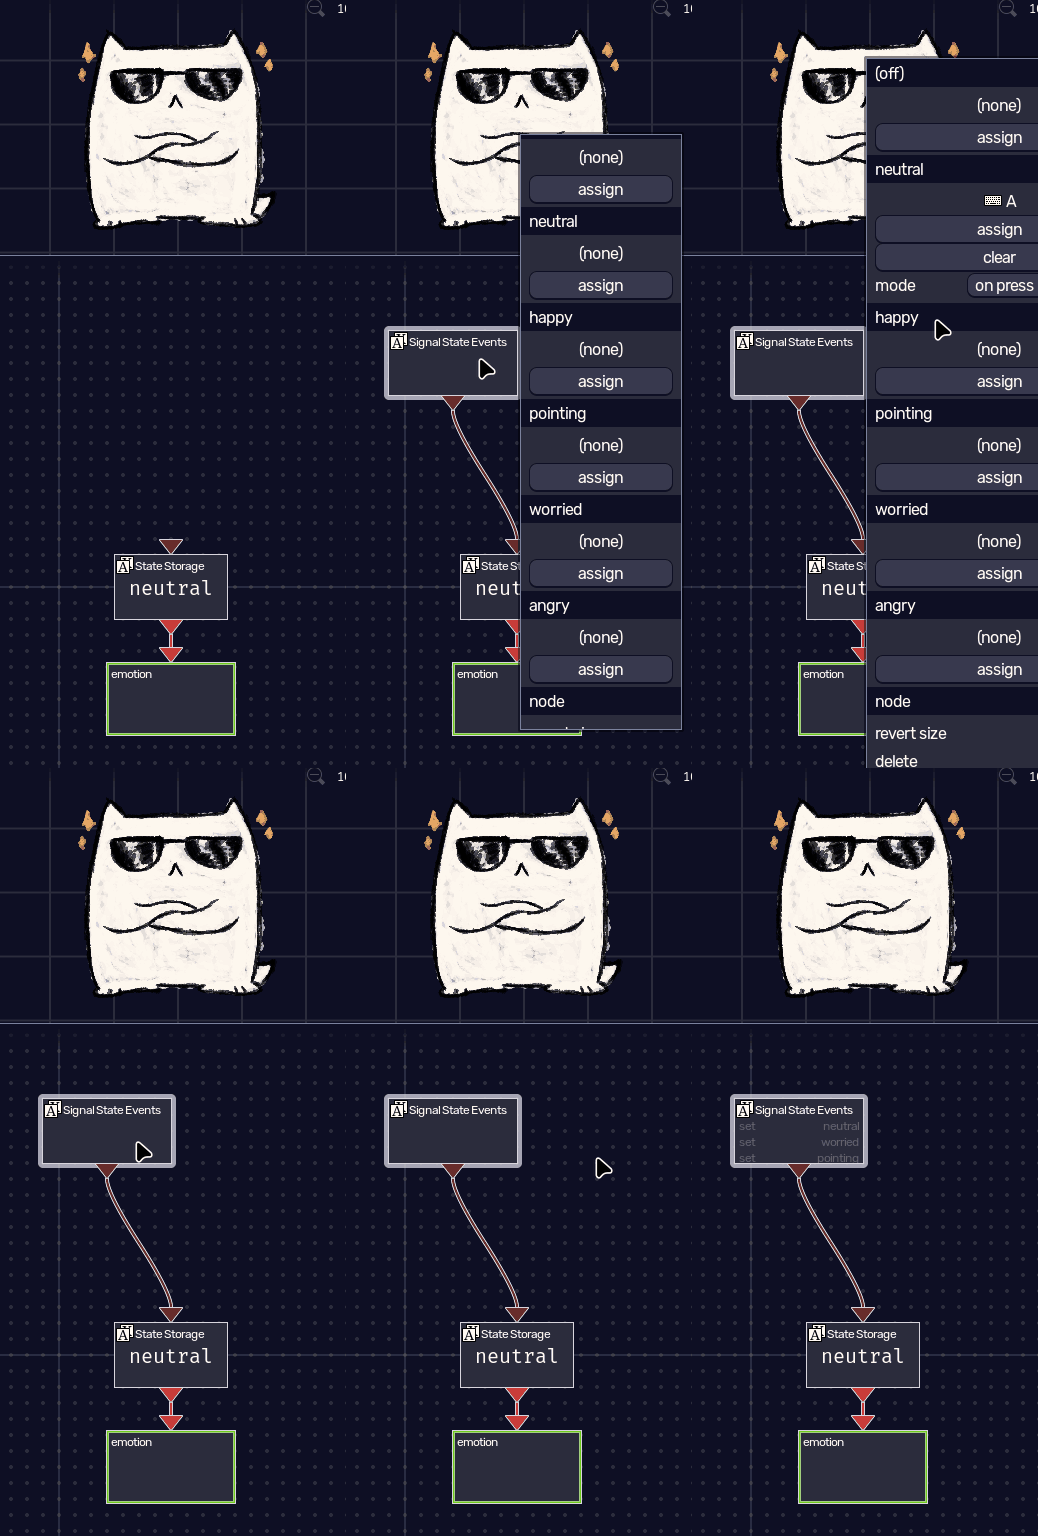
this is also how veadotube mini handles states! it has a Signal State Events node to handle user shortcuts, and a Signal State Events from the Websocket category, both connected to a single State Storage.
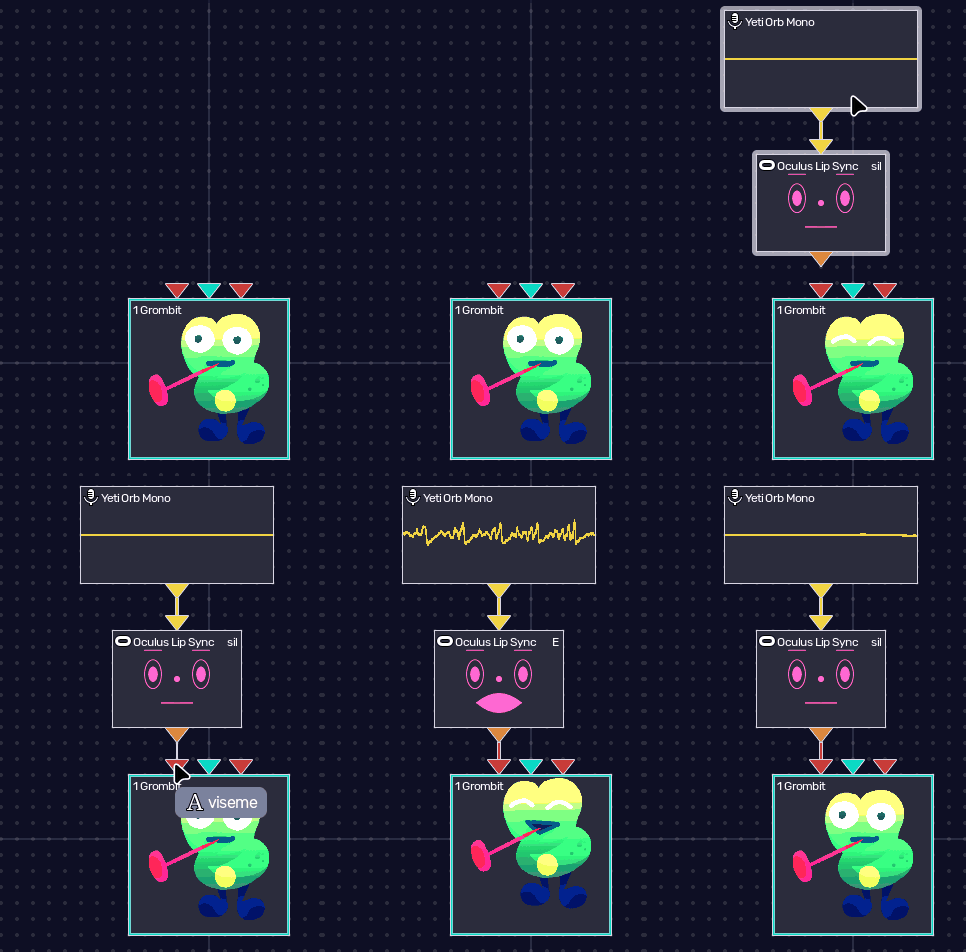
do you know what also outputs strings? the lipsync nodes! they output the most prominent viseme from an audio in the form of a string, so if you create a state group in states where each state is a viseme name, you can plug in a lipsync node directly to the state group node. this is the case for using a HÖNK avatar in a scene, where the voice input is not a simple boolean for open/closed mouth, but proper mouth shapes as visemes.
points and motion
just like the rotate dynamic in layer properties, move lets you change a layer’s position through nodes. the node that spawns receives a  Point value, denoted by a cyan slot
 .
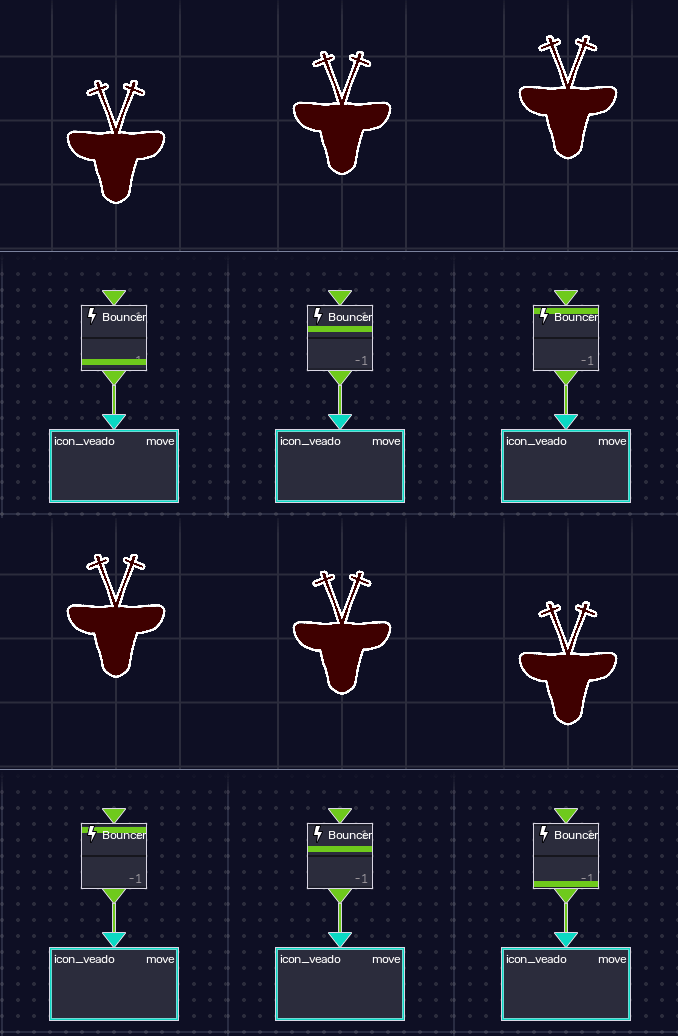
points are just… two numbers. in fact, many nodes that accept points accept numbers as well! you can pass a number to move, and it’ll move the layer in both X and Y by the same amount, multiplied by the X and Y values in the dynamic properties. it means that setting one of the axes to zero makes it move only in the other axis.
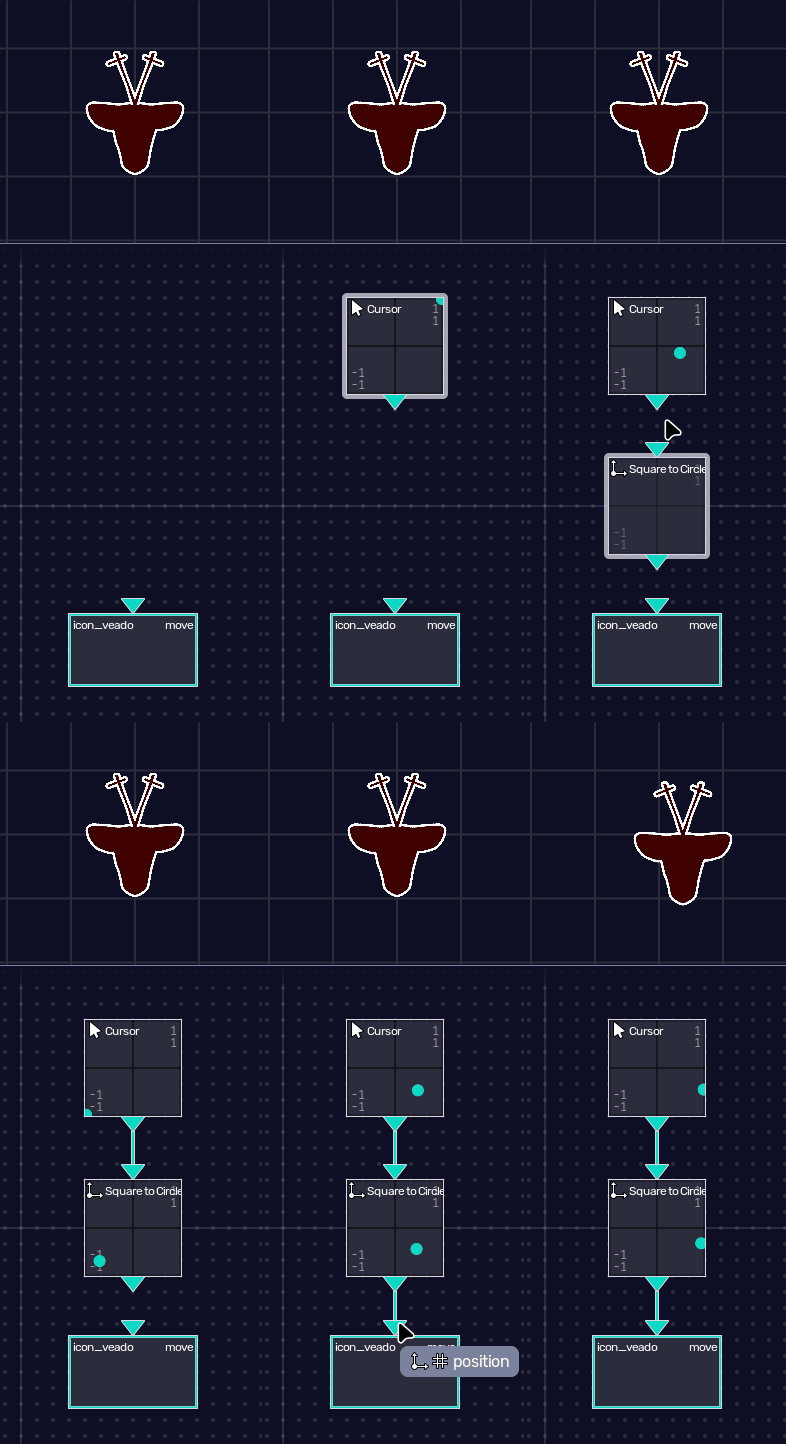
inputs that output points include the Cursor node, which tracks your cursor around the screen and maps it between -1 and 1. most input points are laid out in that square range, which you can convert to a more exact circular range through Square to Circle.
some inputs emit highly specialized data, such as Gamepad, which outputs… a  Gamepad. let’s say we wanna use the left analog stick value: you right-click the Gamepad node, select Stick, and then right-click the new node and select Left Stick. this will be a point ranging from -1 to 1 once again.
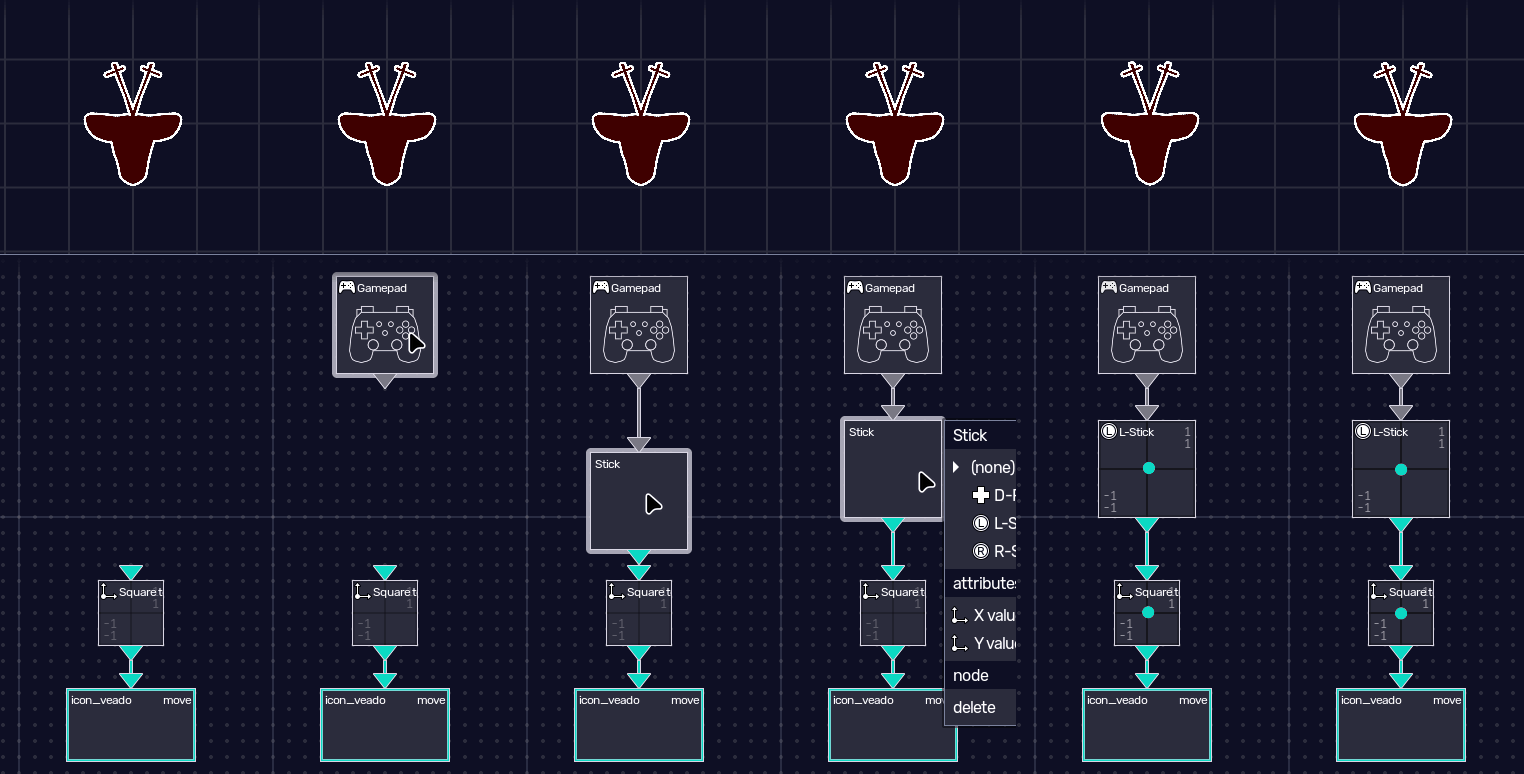
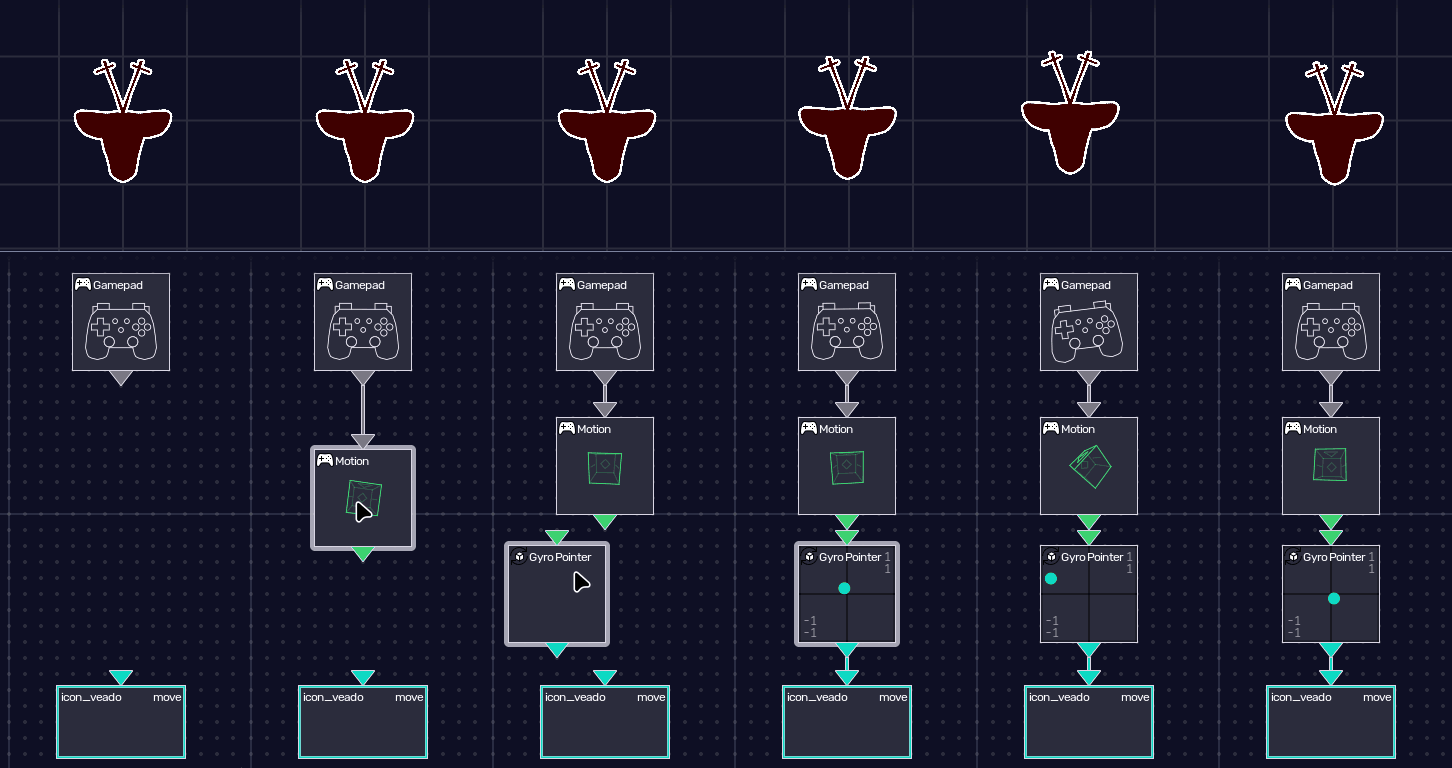
you can also extract the gyroscope/accelerometer values from a gamepad and turn it into kind of a laser pointer. this can be done by right-clicking the Gamepad node, selecting Motion which outputs a  Motion value denoted by a turquoise slot
 , and then creating a Pointer Gyro node to map motion data into a point.
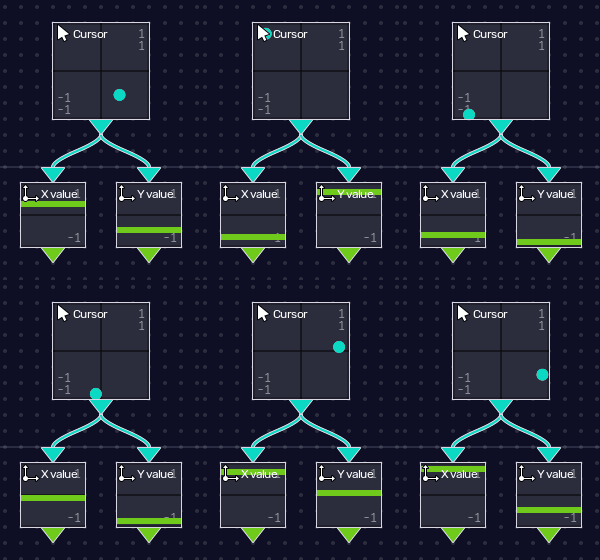
lots of nodes in Math also support points. you can do arithmetics, remap them, even transform them! and if you don’t actually need to use both axes of a point, just like you deconstructed a Gamepad node, you can deconstruct points as well, by right-clicking them and selecting the X or Y axis.
subjects and scores (and bitmaps)
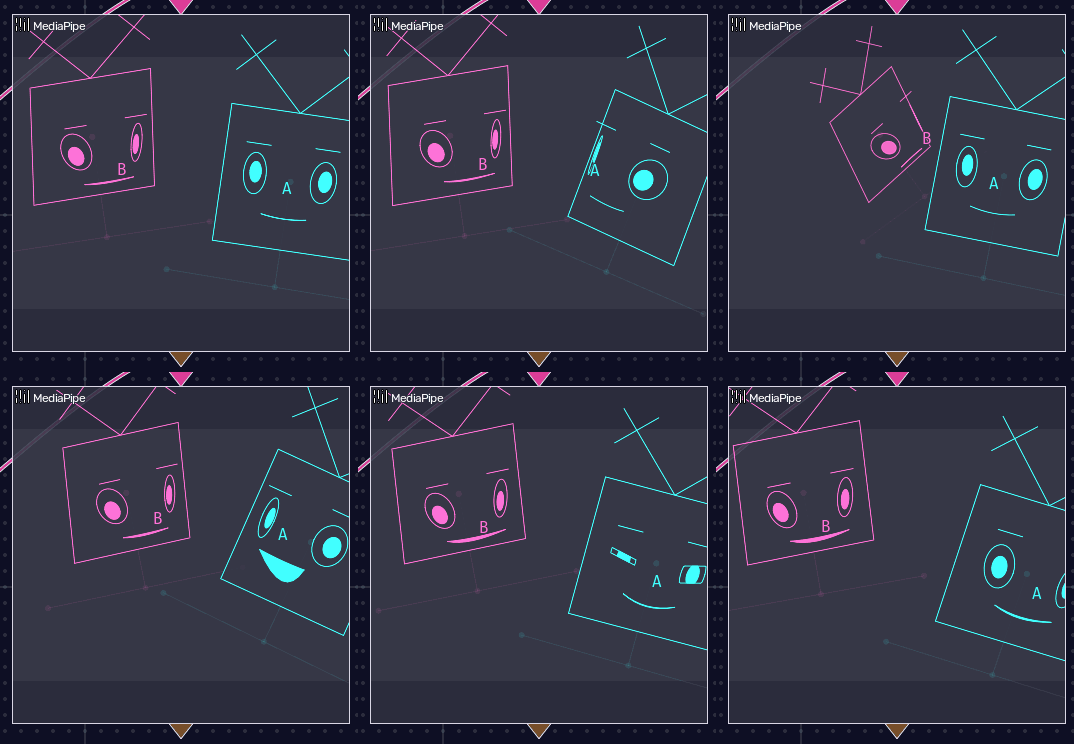
did you notice how lipsync nodes, on top of returning the currently detected viseme, also showed a face moving its mouth? that’s Subject, our generic structure for representing humanoid tracking, and also our tracking mascot in a way.
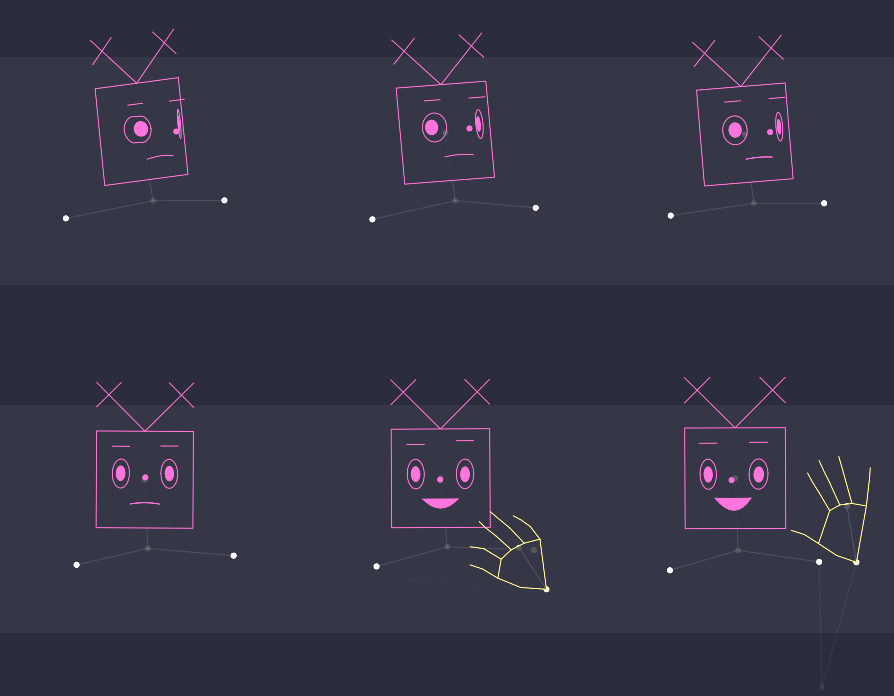
veadotube offers a bunch of different tracking solutions, some for camera-based tracking (body and/or face and/or hands), some for audio-based tracking (lipsync, plain scores), some from external sources (iOS face tracking, protocols such as VMC).
if you got an iOS device, you can use an app like iFacialMocap or VTube Studio, add its respective node under the Integrations category, and configure the node to use the correct ip address. these nodes will output a  Subject value directly, denoted by an orange slot
 .
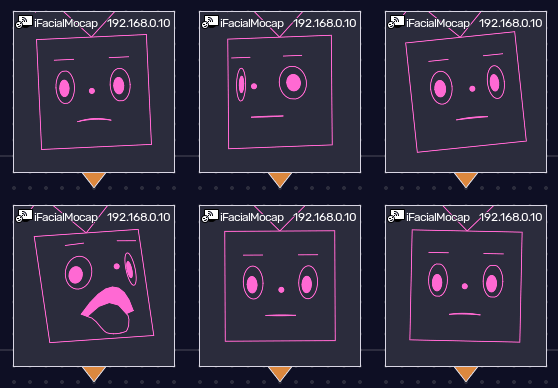
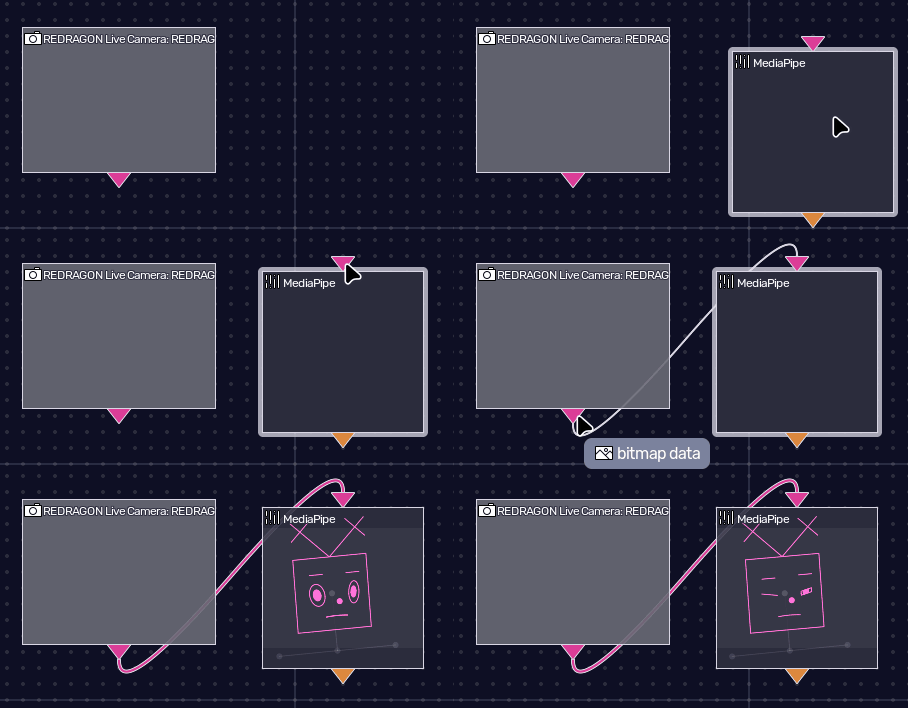
alternatively, you can use your webcam! add a Camera node, and right-click it to select a device. this node will output a  Bitmap value, which is usually a video frame, denoted by a pink slot
 . this node can then be used with one of the many tracking solutions under the Bitmap category. MediaPipe is a good start, which by default will detect a head and track expressions. you can also set it to track an entire body, which is less precise for faces up close, but lets you also track the hands.
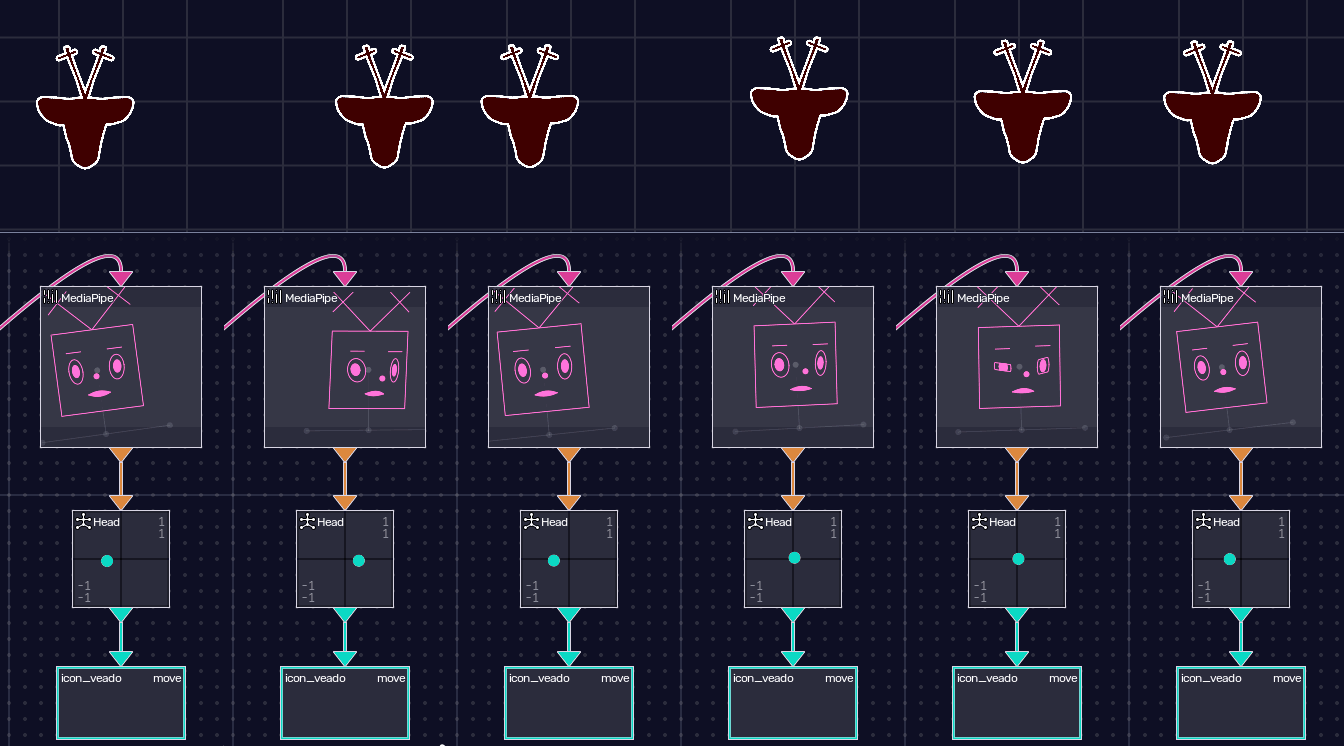
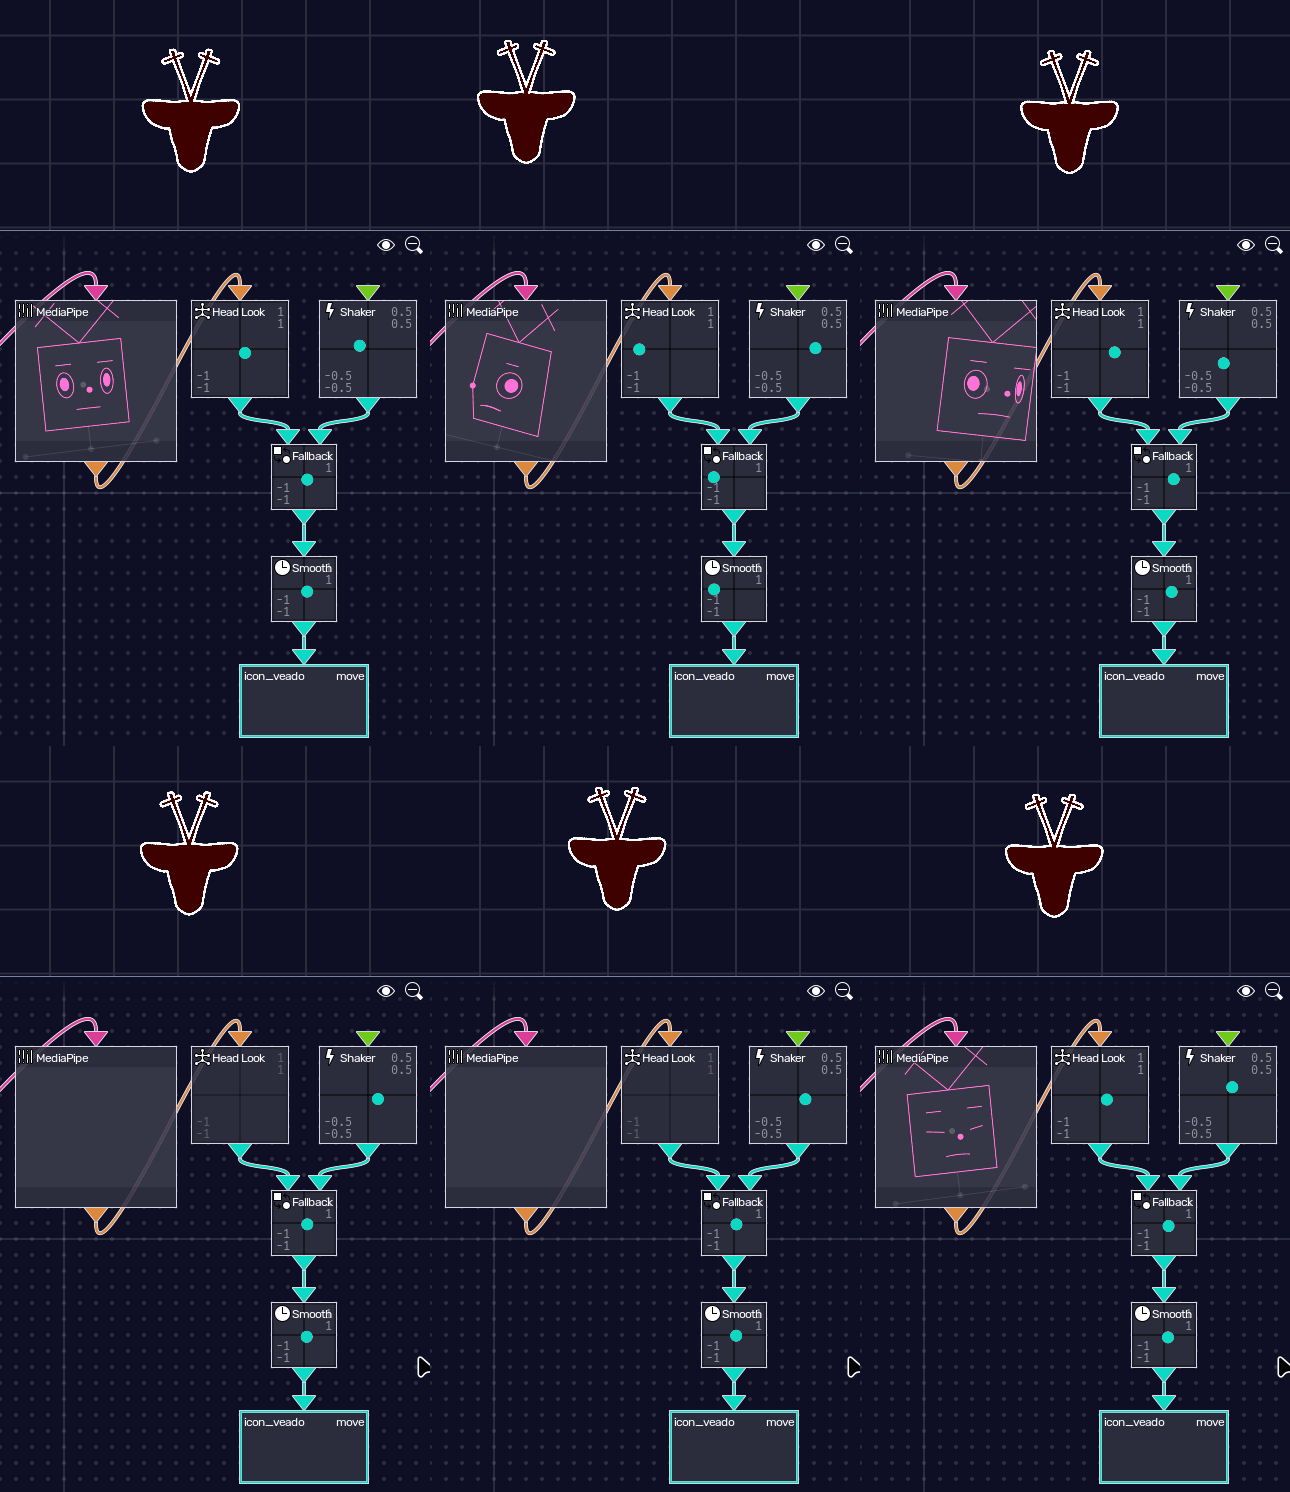
right-clicking on anything that outputs a subject will give you a long list of attributes you can extract from it. for example, Head Look will give you a point from -1 to 1 pointing to the direction the head’s looking at. for eye tracking specifically, you can use Eye. Mouth Curve returns a number where 1 is smiling, -1 is frowning, and 0 is neutral. Body Point set to either hand will give you the position of the hand in the camera feed.
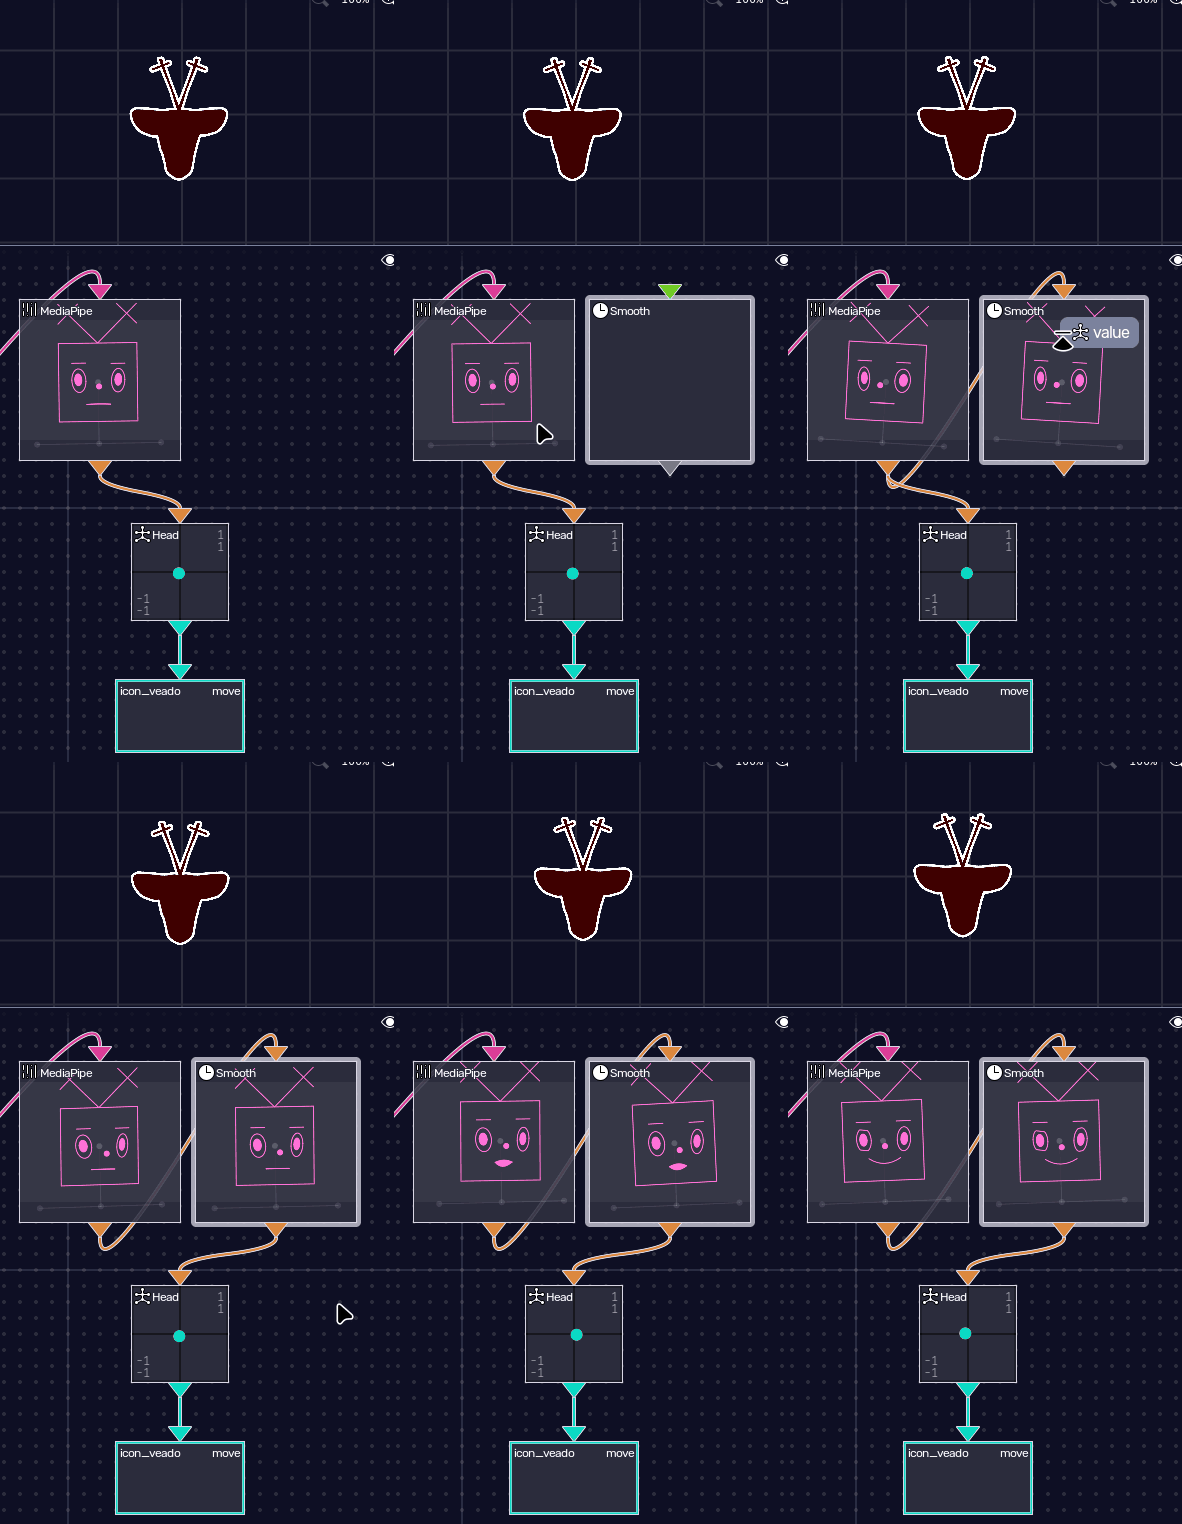
by default, the returned tracking is raw, without any extra smoothing done by veadotube, and so it might look a little erratic. the Smooth node can help with making it look a bit better.
subject attributes also won’t return anything in case it doesn’t have that information. to compensate for lost tracking, you can use a Fallback node, which (optionally, smoothly) snaps to another input in case the first input is not available. then you can use, for example, a point Value to make it fallback to zero, or Shaker to simulate a more natural movement.
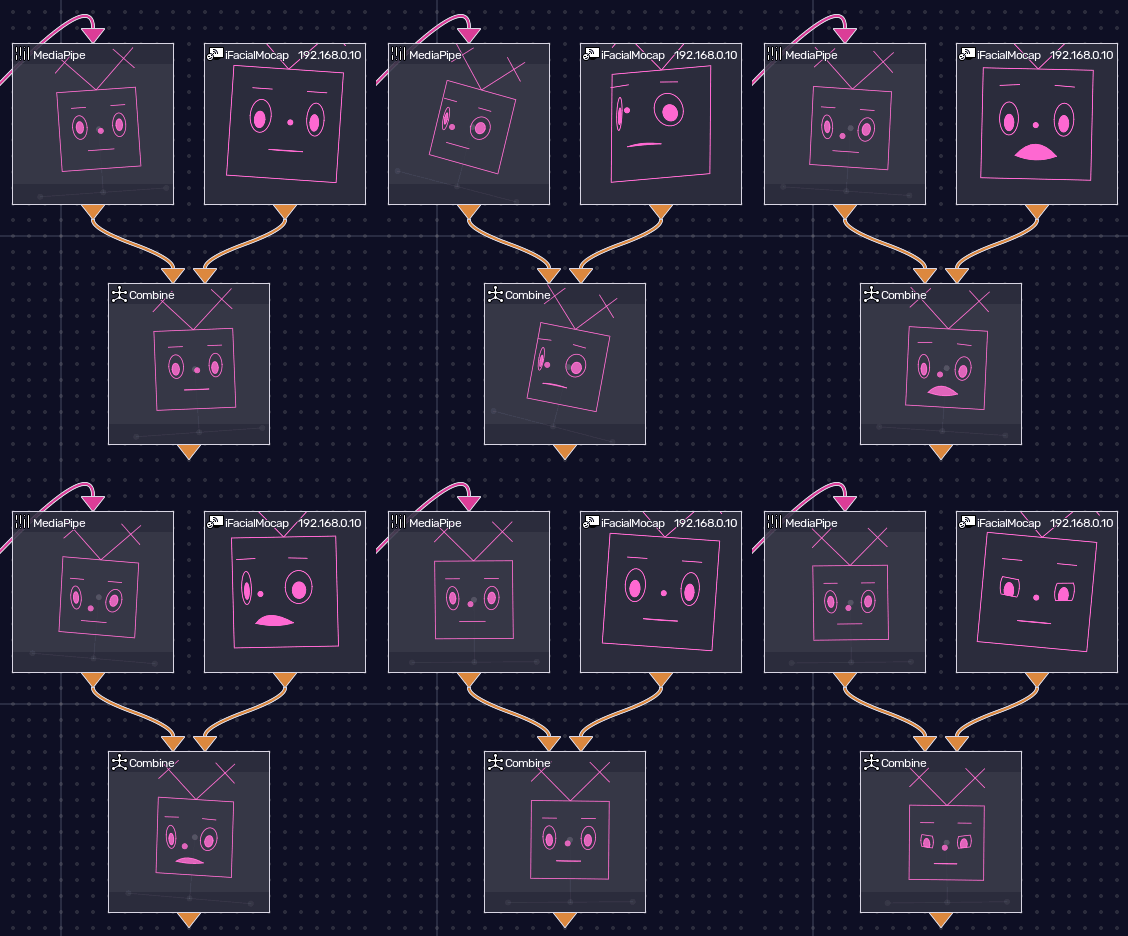
you can also combine the best of all worlds: the subject Combine node lets you take a bunch of tracking data and combine into a single subject! if you got the processing power, that is; camera/audio tracking can be a bit resource-heavy, so running multiple ones at once might make veadotube use more CPU (and RAM!) than usual.
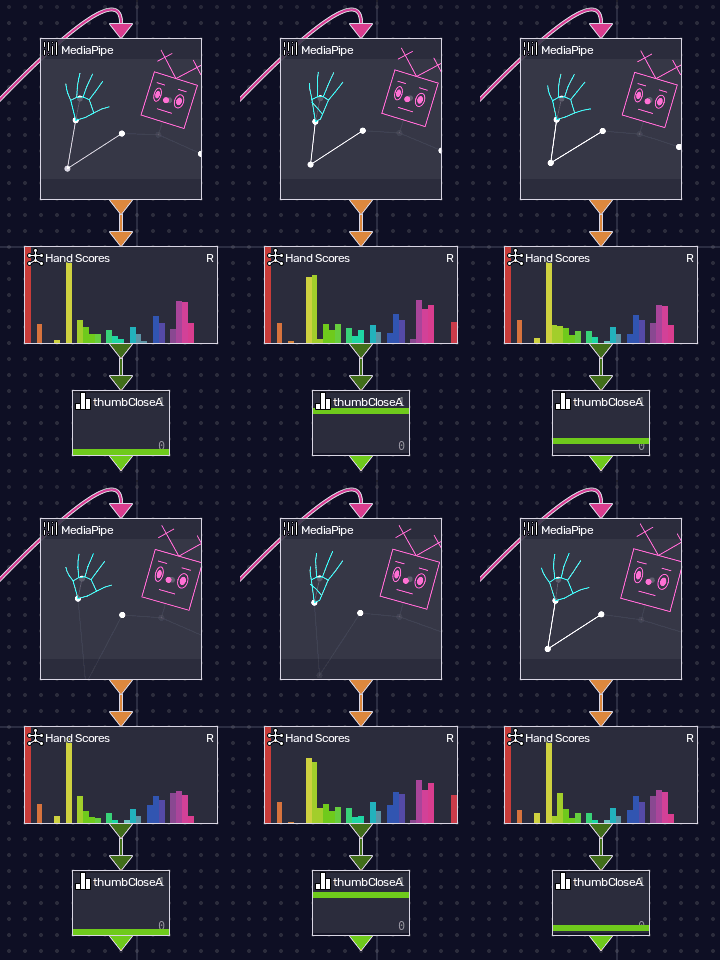
finger tracking is done through the Hand Scores attribute from a subject, which outputs a  Scores value, denoted by a dark green slot
 . scores are a list of numbers that range from 0 to 1, each with a different name. each hand score denotes finger rotations, how closed a finger is, how close one finger is to another, so on.
other nodes that output scores are MFCC, which takes in an audio and extracts abstract coefficients that can be used to detect different voices, phonemes, so on. lipsync nodes also output scores for each lipsync viseme, on top of the resulting subject. Silero VAD, which detects whether someone is speaking or not, outputs two scores: one for the probability of silence, and another for the probability of speaking. a quick way to use scores is to right-click the node and select Score to extract a single score or a group of scores (and then the resulting number is the maximum value of the selected scores).
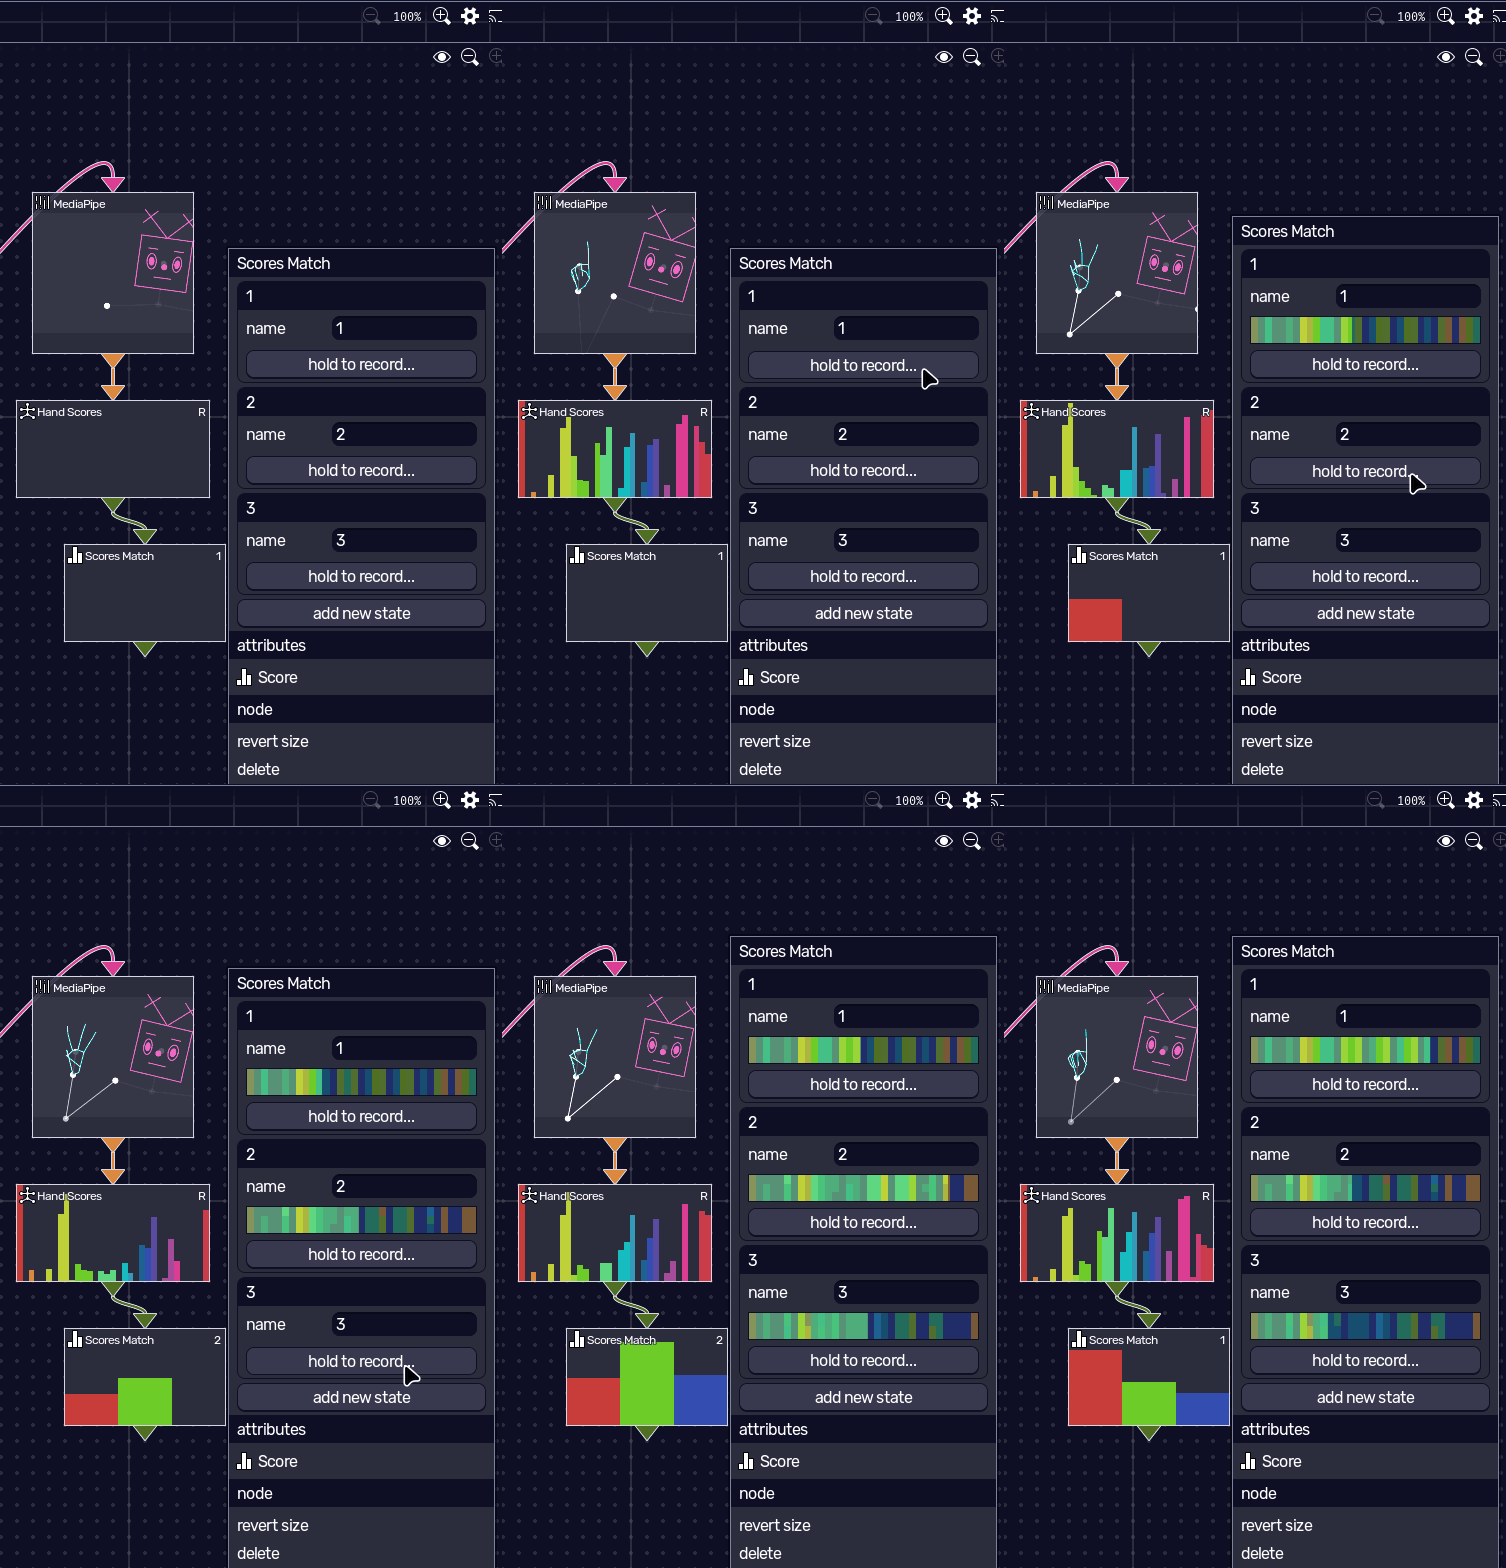
extracting scores this way, however, is only really useful when each score is a more concrete result. for visemes and Silero VAD, it’s all good! for MFCC and hands, where scores end up being noisy and abstract, your best bet would be to use the Scores Match node, which lets you remap scores by recording your own data. for hands, you can record gestures, and for MFCC, you can record voice samples. you can also get Face Scores from a subject to record facial expressions.
subjects can come in groups (a  Subjects value), in case you’re using a node that tracks multiple people. that’s denoted by a dark orange slot
 . it automatically outputs what it judges to be the most prominent subject, but if you wanna select a specific subject, you can use the Select by Position node that extracts a given subject according to its position in the frame (leftmost, closest to center, etc).
delegate nodes
some nodes are automatically spawned to represent other parts of the program. we call these built-in nodes delegate nodes.
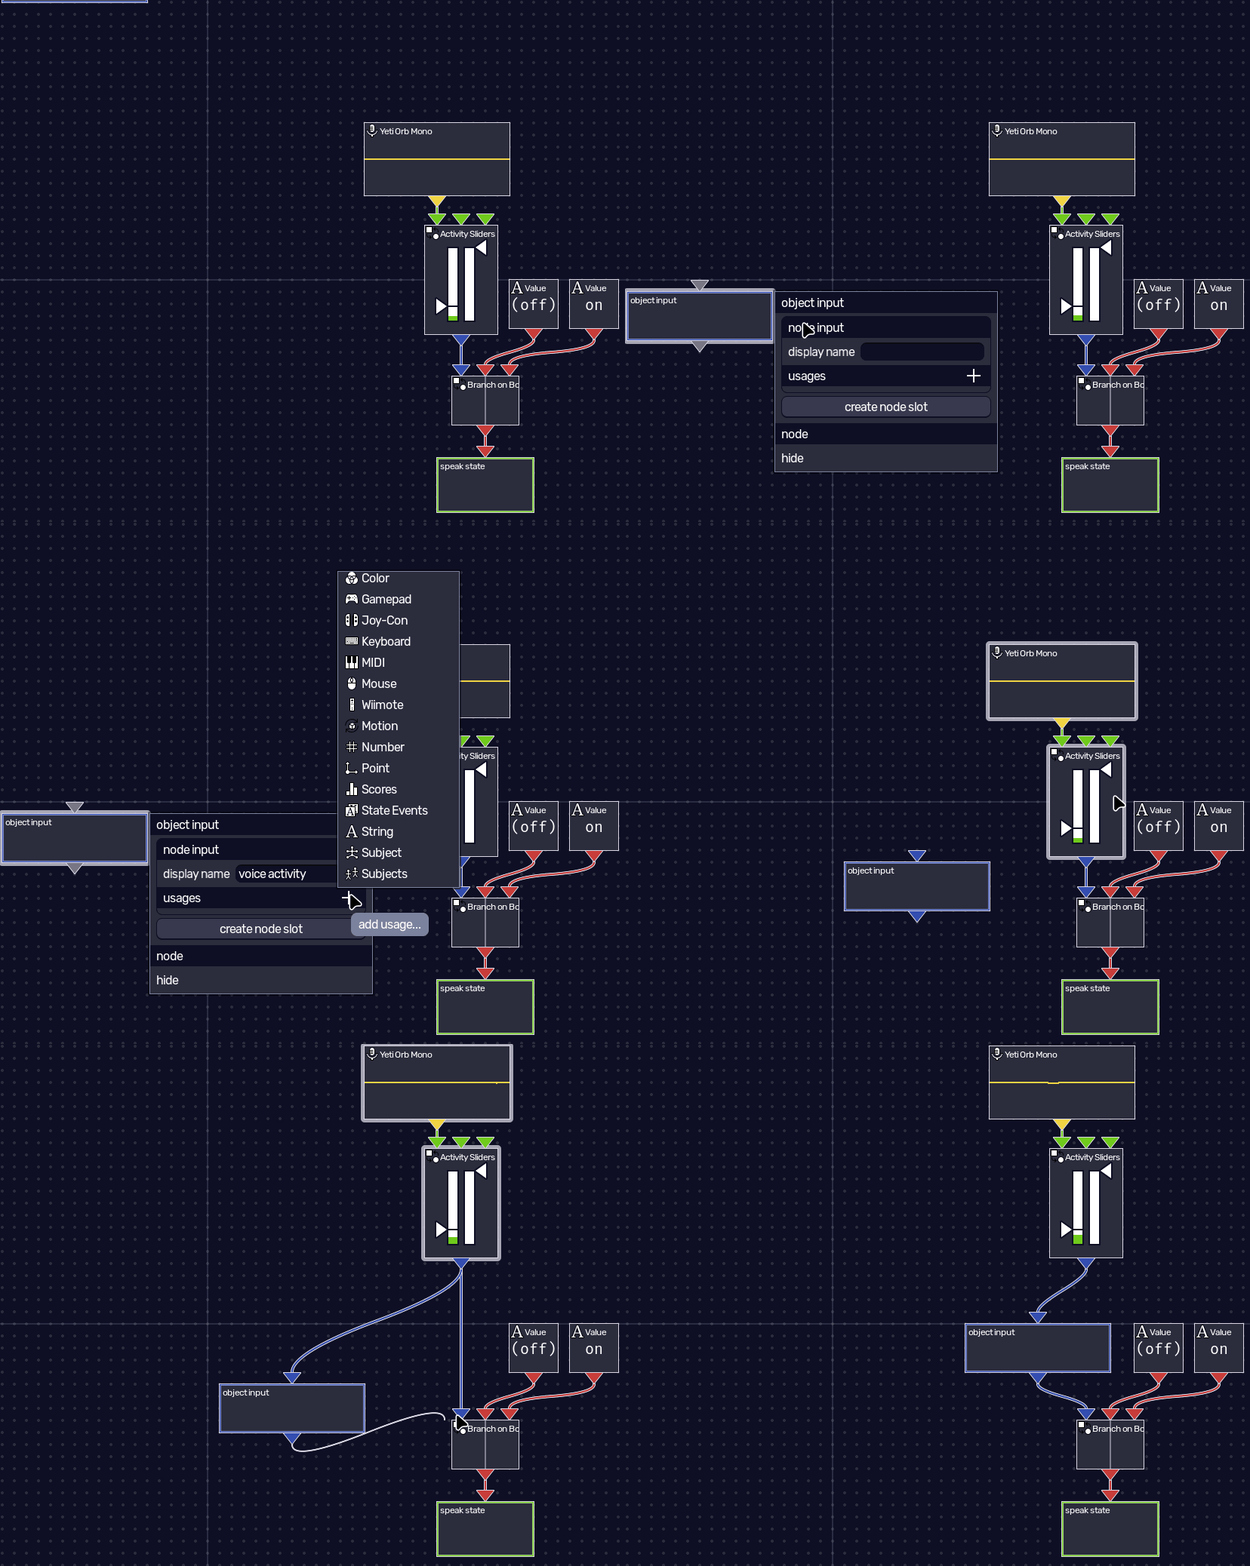
when editing an object in the dynamic avatar editor, the two delegate nodes that show up by default are object input and object output. by right-clicking those, you can edit the input and output slots of this object that show up when importing it in a scene or using it as a layer source in another object in the same avatar file. each slot can have a name and a usage, and nodes connected to object input will be automatically spawned when this object is imported.
in both the scene and dynamic avatar editors, creating a state group in states results in a node that receives a string value; this value must be one of the state names, case-sensitive. if no state matches the string value, it falls back to the default (off) state.
importing an object in objects in the scene editor spawns a node that represents the object’s inputs and outputs. this changes for each object type. if the object is a dynamic avatar object, the inputs and outputs are those mapped in the object input and object output delegate nodes.
same goes for the dynamic avatar editor: creating a layer in layers spawns a node for its inputs and outputs. image layers have inputs for controlling the image time/slice, while object layers will have those mapped in the object input and object output delegate nodes.
at last, adding a dynamic to a layer in layer properties in the dynamic avatar editor can spawn a delegate node, depending on the dynamic type. those can be used to control a layer’s movement, opacity, so on.
as always, you can refer to each guide to better understand what happens when you pass values to these delegate nodes.
node usage catalog
all available usages are the following:
- Number: numerical value. often describes the amount of something, ranging from 0 to 1.
- Boolean: either
trueorfalse, mainly for conditions. inherits Number, returning 0 and 1 respectively. - String: text value, mainly used for state names.
- Point: two numerical values, X and Y, representing a point in a Cartesian plane.
- Audio: audio clip. inherits Number, returning a value between 0 and 1 representing the current volume level.
- Bitmap: bitmap image, usually a frame from a video.

 Color: four numerical values for each color channel (red, green, blue, alpha).
- Motion: rotational value of a 3D object.
- Scores: a group of named numerical values that range between 0 and 1, representing possibilities.
- State Events: event value that says what must be done with a given state on a stack.
- Subject: representation of a humanoid, providing information on face/hand/body tracking.
- Subjects: a group of named subjects. inherits Subject, returning the most prominent one.
as you can see, some of these usages inherit others. for example, you can connect a node that outputs a Boolean to a node that accepts a Number, and it’ll work just fine, as if a true value is 1 and a false is a 0.
most of these usages can be deconstructed into simpler values, using what we call attribute nodes, which can be created by right-clicking a node with a given usage. a Point, for example, lets you deconstruct it into a Number representing the X or Y axis. a single score can be extracted from Scores as a Number ranging from 0 to 1. a Subject has a lot of data you can extract from it, like a Point for the direction of the head, a Number representing the openness of an eye, and so on.
the node system also includes highly specialized usages for certain input types. a Gamepad node, for example, on top of emitting a boolean for whether any button is pressed or not, also outputs the Gamepad usage, with its own attribute nodes for extracting data on specific buttons and sticks. specialized usages are shown as gray .
complete node catalog
if you need a reference for each node that exists in veadotube, we have all of them here, separated by category, with examples where it fits.
we’re always revising the available nodes, and adding more as we need them. consider this section a permanent work in progress!